There are 3 ways to choose an essence
~1~
The easiest way is to simply choose the ones that catches your eye
(trust yourself, this is as valid as any other method)...
~2~
Or read the definitions and choose one that fits you...
~3~
Muscle test or use a pendulum to discern what essence is right for you
(this method gives direct feedback on what is needed
rather than relying on an intellectual assessment).
(drop me a line if you get stumped)
Using a pendulum:
I use a pendulum to test for answers. The best reference I can find is here . You can find more info here: Great link
click here for a...
Mini-Course in Pendulum Dowsing |
  (this is not my pedlulum but its on my wishlist :) |
Muscle Testing: |
 |
Kinesiology Self-Testing Steps
1. The Circuit Fingers. If you are right-handed: Place your left hand palm up. Connect the tip of your left thumb with the tip of the left little finger. (Not your index finger. I'm talking about your thumb and little finger.) If you are left-handed: Place your right hand palm up. Connect the tip of your right thumb with the tip of your right little finger. By connecting your thumb and little finger, you have just closed a major electrical circuit in your hand, and it is this circuit you will use for testing.
Before going on, look at the position you have just formed with your hand. If your thumb is touching the tip of your index or finger #1, laugh at yourself for not being able to follow directions, and change the position so you touch the tip of the thumb with the tip of the little finger. Most likely this will not feel at all comfortable to you. This is because you normally don't put your fingers in this position and they might feel a little stiff. If you are feeling awkwardness, you've got the first step of the test position! In time, the hand and fingers will adjust to being put in this position and it will feel fine.
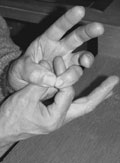
Circuit fingers can touch tip to tip (Fig. A), finger pad to finger pad (Fig. B), or thumb resting on top of the little finger's nail (Fig. C). I rest my thumb on top of my little finger. And I suggest this position for anyone with long nails. You're not required to impale yourselves for this.
When you have the circuit fingers in position, they form a circle. If you straighten fingers 1, 2 and 3 a bit, you'll get them out of the way and you'll see the circle.
2. The Test Fingers and Testing Position. To test the circuit (the means by which you will apply pressure), place the test fingers, thumb and index finger of your other hand (Fig. D), inside the circle you have created by connecting your circuit thumb and little finger. The test fingers (thumb/index finger) should be right under the circuit fingers (thumb/little finger), touching them, with your test thumb resting against the underside of your circuit thumb and your test index finger resting against the underside of your circuit little finger. (Fig. E) Don't try to make a circle with your test fingers. They are just placed inside the circuit fingers that do form a circle. It will look like you have two "sticks" inserted inside a circle.
3. Positive Response. Keeping this position, ask yourself a simple question in which you already know the answer to be "yes." ("Is my name _____?") Once you've asked the question, press your circuit fingers together, keeping them in the circular position. Using the same amount of pressure, try to press apart or separate the circuit fingers with your test fingers. Press the lower thumb against the upper thumb, and the lower index finger against the upper little finger.
The action of your test fingers will look like scissors separating as you apply pressure to your circuit fingers. Your testing fingers, the fingers inserted in the circuit circle, will remain in position within the circle. (Figs. F and G) All you are doing is using these two testing fingers to apply pressure to the outer two circuit fingers. Don't try to pull your test fingers vertically up through your circuit fingers.
The circuit position described in step 1 corresponds to the position you take when you stick your arm out for the physician. The testing position in step 2 is in place of the physician or other convenient arm pumper. After you ask the yes/no question and you press your circuit fingers tip-to-tip, that is equal to the doctor saying, "Resist my pressure." Your circuit fingers now correspond to your outstretched, stiffened arm. Trying to push apart those fingers with your testing fingers is equal to the doctor pressing down on your arm.
If the answer to the question is positive (if your name is what you think it is!), you will not be able to easily push apart the circuit fingers. The electrical circuit will hold, your muscles will maintain their strength, and your circuit fingers will not separate. You will feel the strength in that circuit.
Calibrating the finger pressure: Be sure the amount of pressure holding the circuit fingers together is equal to the amount of your testing fingers pressing against them. Also, do not use a pumping action (pressing against your circuit fingers several times in rapid succession) when applying pressure to your circuit fingers. Use an equal and continuous pressure.
Play with this a bit. Ask a few more yes/no questions that have positive answers. Now, I know it is going to seem that if you already know the answer to be "yes," you are probably "throwing" the test. Well, you are. This is your tool for calibrating your fingers for feeling the strong positive. You are asking yourself a question that has a positive answer. If your circuit fingers are separating, you are applying too much pressure with your testing fingers. Or you are not putting enough pressure into holding your circuit fingers together. You need to keep asking the question and play with the testing until you feel pressure in all four fingers and the pressure in your testing fingers is not separating your circuit fingers. You don't have to break or strain your fingers for this; just use enough pressure to make them feel alive, connected and alert. When this happens, you now have a clear positive kinesiology response.
4. Negative Response. Once you have a clear sense of the positive response, ask yourself a question that has a negative answer. Again press your circuit fingers together and, using equal pressure, press against the circuit fingers with the test fingers. This time, if the testing-fingers' pressure is equal to the circuit-fingers' pressure, the electrical circuit will break, and the circuit fingers will weaken and separate. Because the electrical circuit is broken, the muscles in the circuit fingers do not have the power to hold the fingers together. In a positive state the electrical circuit holds, and the muscles have the power to keep the two fingers together.
Different styles in how the fingers separate: How much your circuit fingers separate depends on your personal style. Some people's fingers separate a lot. (Fig. H) Other's barely separate at all. (Fig. I) Mine separate about a quarter of an inch. (Fig. J) Some people's fingers won't separate at all, but they'll definitely feel the fingers weaken when pressure is applied during a "no" answer. Let your personal style develop naturally.
Resting your forearms: If you are having a little trouble feeling anything, do your testing with your forearms resting in your lap. (Fig. K) This way you won't be using your muscles to hold your arms up while you are trying to test.
Calibrating and equalizing the pressure used by the circuit fingers and the testing fingers for negative responses: Play with negative questions and continue adjusting the pressure between your circuit and test fingers until you get a clear negative response.
When you're feeling a solid separation, return to positive questions. Once again, get a good feeling for the strength between your circuit fingers when the electricity is in a positive state. Then ask a negative question and feel the weakness when the electricity is in a negative state. Practice your testing by alternating the questions.
In the beginning, you may feel only a slight difference between the two. With practice, that difference will become more pronounced. For now, it is just a matter of trusting what you have learned — and practicing.
The testing calibration: Especially in the beginning, and even sometimes after you have been doing kinesiology successfully for awhile, you may lose the strong feeling of the positive response and the weakness of the negative. You've just lost the equal pressure between your circuit and testing fingers and one set is overpowering the other.
When this happens, just back away from whatever you are trying to test and do a testing calibration. Ask yourself a question that you know has a positive answer and test for the response. Adjust the pressure between your testing and circuit fingers until you feel a strong, positive response. Play with this a bit and get a good feel for the strength of the positive responses.
Then switch to questions that have a negative response and play around with the pressure until you feel a clear breaking of the circuit.
After this, alternate your questions between positive and negative a few times and test the answer. In no time, you'll have the "kinesiology feel" back and you can resume testing where you left off.
Don't forget the overall concept behind kinesiology. What enhances our body, mind and soul makes us strong. Together, our body, mind and soul create a holistic environment that, when balanced, is strong and solid. If something enters that environment and negates or challenges the balance, the environment is weakened. That strength or weakness registers in the electrical system, and it can be discerned through a muscle-testing technique — kinesiology.
Important: Do a testing calibration as soon as your testing feels a little off or funny to you so that you won't waste time doing a bunch of testing and not being sure of the accuracy of those answers. If you want accurate results in anything you are testing, you will have to retest those parts where you felt your testing to be suspect. So do a testing calibration sooner rather than later. It'll save time in the long run.
Copyright Michelle Small Wright
